
I know what you’re thinking… a blog post about blogging. Could there be anything more cliche on the internet?
While I tend to agree, I’d be lying if I said I didn’t read a lot of posts by Bloggers about Blogging. It can be very interesting and I’m still in the learning phase, so I welcome the abundance of information out there.
This article focuses on some milestones in my first month blogging and the tools I’m using to get my blog up and running.
I’ve done my best to document what I did, how I did it, and what you the reader could find helpful in your own blogging journey.
If you’ve already got your blog up and running and want to get right into monetizing it, check out my latest article: Monetizing Your Blog in 6 Easy Steps.
My Recommendations for New Bloggers:
- Creating Legal Pages First!
- Namecheap.com
- Bluehost
- Adobe Spark
- Scrivener
- Tailwind
- Making Sense of Affiliate Marketing Course
Why I Blog
I’m not a guy with a shortage of hobbies. My wife thinks I’m a little nuts actually. Some of the things I love and consider a hobby or interest include:
- Classical Guitar (Yes, even though I’m a professional ‘non-classical’ guitarist)
- Chihuahuas (we have 4)
- Chess
- Video Games (Particularly RPG’s)
- Star Wars Anything
- Photography
- Drawing and Art
- Learning Spanish
- Vinyl Records (Collecting and listening)
- Skateboarding
- Cooking
- Computers and Technology
- Writing
- Yoga
Don’t show it to me because I’m probably gonna wanna start doing it with you.
Monetize Your Blog
So why writing?
I’ve always liked writing. I’d like to think I have a pretty interesting life being a Professional Musician for over 25 years. Does that warrant a blog? Am I any good at writing?
I don’t know, but it’s FUN.
I’ve worked on 2 different books (1 Guitar Instructional and 1 Fictional Novel) and finished neither of them. My spelling is good but my grammar is probably average at best.
Am I qualified to even do this? Will anyone care? Will my friends think it’s stupid?
All I know is anything is better than arguing on Facebook. I had to get away from that type of social media and put my writing energy into something else, thus the blog you’re reading right now.
I definitely don’t have a niche yet, so I’m all over the place with my writing this first month.
Topics like Dogs, Guitar, Vinyl Records, Blogging and a few other things I’m working up doesn’t exactly instill trust from the reader. I can only hope that over time a style and perhaps even a niche emerges.
Niche or not, I’m having a blast getting some of this stuff out and am genuinely enjoying the process. While I do have some ads and affiliate links on the site, it’s certainly not my motivation for writing. I really do enjoy this.
I’ve read posts by some great, (and not-so-great) bloggers documenting everything from their monthly blog income reports to how they setup their blogs step-by-step.
I thought a few months or even years from now it would be interesting to take a look back and see what I did that first month.
I may even do one of these reports every month if anything interesting happens. Actually, I’m sure that I will.
Regardless of what the future holds, one thing is certain…. I enjoy writing about the things I love and will continue to do so indefinitely.

I’d also like to think that somewhere out there is someone who is exactly 30 days behind me who could use some help. Maybe this will help you or someone you know get started with a blog and hopefully avoid some of the mistakes I’ve made along the way.
My First Month Blogging – (August 2018)
The Domain Name
I bought this domain name at Godaddy.com on July 31st, 2018. This was my first mistake. I could have saved $15 at Namecheap.com.
I had a few ideas of what I wanted and also keep it in a slightly musical theme. I was pretty pleased and surprised I got lifein12keys.com, even though I overpaid a bit for it. It’s not too long and could mean several things, least of which being the 12 keys in music.
I’m way out of practice when it comes to internet and website stuff but I knew I had to host it somewhere.
I made the decision to host it somewhere myself rather than use the free sites that just (to me) look lame and unprofessional. Not only that, but they are riddled with ads that the user doesn’t make anything from.
If I’m gonna have ads on my website… I want to put them there myself and be the one to make income for my hard work. Thats how it should be right?
Hosting my Blog
My Second Mistake:
After a bit of searching I found Bluehost.com on August 1st. Had I found them one day earlier, I would have saved myself $15 bucks buying the domain at Godaddy again….
Bluehost gives you a free domain name (yes, you still own it even if you leave them) when you signup for any of their hosting plans.
I grabbed another free domain and signed up for their “Choice Plus Plan” ($5.95/mo.) It’s probably more than I’ll need but inexpensive regardless.
The Basic Plan ($3.95/month) would be more than enough for someone with one website.
Here’s a link to all of their plans: Click Here

I could write a tutorial on how to setup a website with Bluehost.com, but honestly it was so easy I don’t need to.
Plus, the tutorials on their support page are excellent.. but you probably won’t need them.
Bluehost is a solid, inexpensive choice for newbies just starting out.
Advice: Don’t bother with Godaddy or a domain registrar unless you’re buying a bunch of domains at once. You get a free, configured domain that you own from Bluehost.com upon signup.
If you’re more advanced, or like me have a friend who can setup a virtual dedicated server, AWS is the way to go.
My best friend Dave (http://dgohara.me ) setup a Linux machine with WordPress installed and the rest is history. I like knowing I’m in a Virtual Server environment without anyone else’s high-traffic website slowing my website down.
After a few weeks with Bluehost I moved everything over to AWS. So far, so good. You can check out their plans here:
WordPress
Setting up WordPress was just as advertised, 1 click. Gone are the days of database creation, FTP uploads, directory permission nonsense.. its just 1 click! That’s it.
Once WordPress was installed, I haven’t needed to do anything outside of the WordPress Dashboard. I’m sure that will change if I decide to create email lists or more advanced stuff, but I haven’t messed around with any of that yet.
I went through every option in the dashboard sidebar and filled out what I could. Anything I didn’t understand or didn’t need I left alone.
WordPress Themes
I was aware of the concept of themes. A kind of pre-made, well laid out template from which to build and customize your website.
What I wasn’t prepared for was the vast, seemingly endless number of themes available (both free and for sale).
I ended up buying a relatively cheap $49 theme. It was a simple 1-click install as well. I have to say it hasn’t turned out as good as I had hoped, so I may switch themes in a month or so.
A new blogger friend recommended the Genesis Framework, so I may check that out and report back.
One thing I did like about my theme was the included “dummy content”.
Simply uploading a provided .xml file from the dashboard I was able to populate my blog with pre-made “fake” articles and posts. Some themes include this and some do not.
This gave me a better idea of how to tweak colors and layout without having to actually create my own content first.
Once I got the hang of using my theme, I simply mass-deleted the sample post content and started creating my own real content.
Setting Up My Categories in WordPress
It’s fairly self-explanatory. You click Posts/Category, name it, tick off a few options and submit it. Easy.
One thing I wish I knew…
Advice: Don’t create a bunch of Categories or sub-categories until after you’ve published content that goes in them. You’ll have a bunch of dead links going nowhere (or uncategorized) until you’ve created blog content to populate them all.
WordPress Plugins
I haven’t become emotionally attached to any particular plug-ins yet. So far, I’ve only installed three:
- Pretty Links – Makes links look better with options for just about everything pertaining to linking into or out of your website. Also helps control no-follow links which are important (to Google).
- Social Pug – This puts a Pinterest, Facebook and Twitter button at the beginning and end of each post automatically along with share counts for each.
- Smush – Controls the amount of compression for images uploaded into the WordPress Media Directory.
Initially I couldn’t figure out why my images seemed blurry once they were on the site. After installing Smush, I lowered the setting and now everything looks fine. Who knew?
Advice: Don’t spend money on plug-ins until after you try a few that do the same thing you’re looking for. You’ll probably be fine with a free version to start with.
Creating Some Essential Pages in WordPress
Before you get started on your new blog, you should take some time to create the essential pages needed to make yourself (and your blog) look legit. This is very important and should not be overlooked!
I created the standard pages right away, even before my first article was published.
- About – My About Page isn’t great but I wanted to at least humanize my blog a bit with some pictures and a little info. If you’re not sure where to start, check out some of your favorite blogs and use their About pages as a guide.
- Contact –Pretty self-explanatory, but you want to provide a way for your readers and potential clients or affiliates to get in touch with you.
- Legal Disclaimer Pages – This one is super important. With all of the recent GDPR rules and regulations for websites it is vital that you legally protect yourself. If you do one thing to your new blog, make it this one!
Amira Law
I met this girl Amira (a fellow Floridian) in a Facebook Group. I’ve joined a few of these groups and have found some to be very helpful, while others not so much. I kept noticing this stunningly drop-dead gorgeous Lawyer who always seemed to be so helpful and quick with great advice and information. I decided to check out her stuff.

Amira Law
She has her own Facebook Group – A Self Guru Biz Blog Community which has been my favorite so far. Everyone is so helpful and friendly without the overbearing and often arbitrary rules of other groups. Check it out!
If you haven’t made your legal pages yet, do it ASAP. You can’t copy/paste someone else’s pages either. If you’re like me and NOT a lawyer, Amira Law has a pack with everything you need. Her Legal Bundle Pack has everything you need to get going immediately.
You can also get the pages individually if you like: Terms and Conditions, Privacy Policy or Disclaimer.
Creating Blog Graphics
Years ago I had become fairly good with Photoshop, but it just seemed like complete overkill for what I wanted to do with this blog.
What I needed was very simple:
- Create attractive graphics for each blog post title.
- Create attractive graphics in the articles themselves.
- Create attractive graphics for Pinterest, Facebook, Twitter and Instagram.
After surfing around and seeing what other people were using I narrowed it down to the BIG 3 most popular graphics apps:
Pic Monkey
$7.99/month and you have to use your own base photographs? No thanks.
I’m not much of a photographer and I really needed something that had stock photos, graphics and designs included. Pic Monkey was not a good option for me.
Canva
I used canva for my first 2 blog posts and a few graphics. It’s easy to use and inexpensive but the low quality of the images and lack of high quality stock photos steered me away.
Also, in case you didn’t know, EVERYONE uses Canva. So your website and Pinterest graphics end up looking just like everyone else’s graphics.
If you’re on a super tight budget and don’t want to spend anything it’s certainly useable if you don’t mind the Canva logo on everything you create.
A lot of people swear by Canva and I can see why. It is easy to use, but lacks some key features I wanted for future growth of my online presence.
Oddly enough I found this on my own just trying to improve upon what I was doing in Canva.
I installed Adobe Lightroom CC on my old Macbook Pro to manage and edit all of my photos and sync with my iPad as an alternative to Apple Photos.
Save Money With A Certified Pre-Owned Macbook!
I thought wow, wouldn’t it be great if Adobe made something like Canva but sync’ed with the Adobe Creative Cloud… uh yeah, well they do.
Adobe Spark Post. I made this graphic in Spark in under 30 seconds:

Spark Post is similar to Canva (and Pic Monkey) in the simple way you create a graphic. The image quality is better and I love being able to pull in my own pictures from Lightroom CC on my Mac for editing. Also, the iPad app is amazing!
There are pre-made size templates for all of the social media platforms including vertical Pinterest pins and horizontal Facebook posts etc, al.
I also have access to the enormous collection of Free Adobe Stock Photos for backgrounds and templates.
Adobe Stock stuff is way better than any of the free image libraries you’re going to find out there.
Adobe Image Library is also constantly growing all the time with a vibrant community of professional artists and photographers.
I decided to make my second investment in my blog by going with the $9.99/month (Photographers Plan). When you sign up for the Photography plan it unlocks the full Adobe Spark.
I get 20 GB of space sync’ed between my desktop and mobile devices, and sync’ing between my personal photos in Lightroom CC and Spark Post WITHOUT an Adobe logo cluttering up my images like Canva does.
If you’re already using another Adobe product you can add Spark for free or choose from many configurable plans located here. I really love this one! Great find.
Adobe Plans:
Writing
After fooling with WordPress, my theme, graphics and plug-ins, it was time to get to the real stuff. Writing.
On August 10th I wrote my first article!
I was geeking out on my new Apple TV 4K and thought a simple review idea would be an easy first article.
It was a good learning experience for how WordPress works, formatting, graphics and everything else that goes along with each article I create. Not my best work, but a genuine review on a product I love.
Workflow
I’m still working on my writing process and workflow. My problem wasn’t blasting out 2000+ words, it was what to use to do it with.
I had been writing in Pages on my iPad, Mac, Word, (I hate MS Office), and Notes. I even tried directly writing in the WordPress app (Don’t bother, it’s a horrible app).
After a quick Google search for “Best Writing Apps” I came across my absolute favorite discovery in this process, the Scrivener App.
Writing with Scrivener
Scrivener is so simple and elegant it’s almost hard to write ABOUT it. It just works.

Scrivener is intuitive in a way I didn’t know I wanted or needed, even though now I couldn’t imagine writing without it.
All of my Blog Posts, Articles, Web Pages, Ebooks, Guitar Lessons, Drafts and Ideas start off in Scrivener. Even my annoying legal pages and disclaimers are saved in Scrivener.
Things can be organized in many ways with folders, research notes, graphics, projects and drafts. I’m still learning all of Scrivener’s many features, but so far I just love it.
Once I write and edit a “draft” in scrivener I simply copy and past it into WordPress for final web publication.
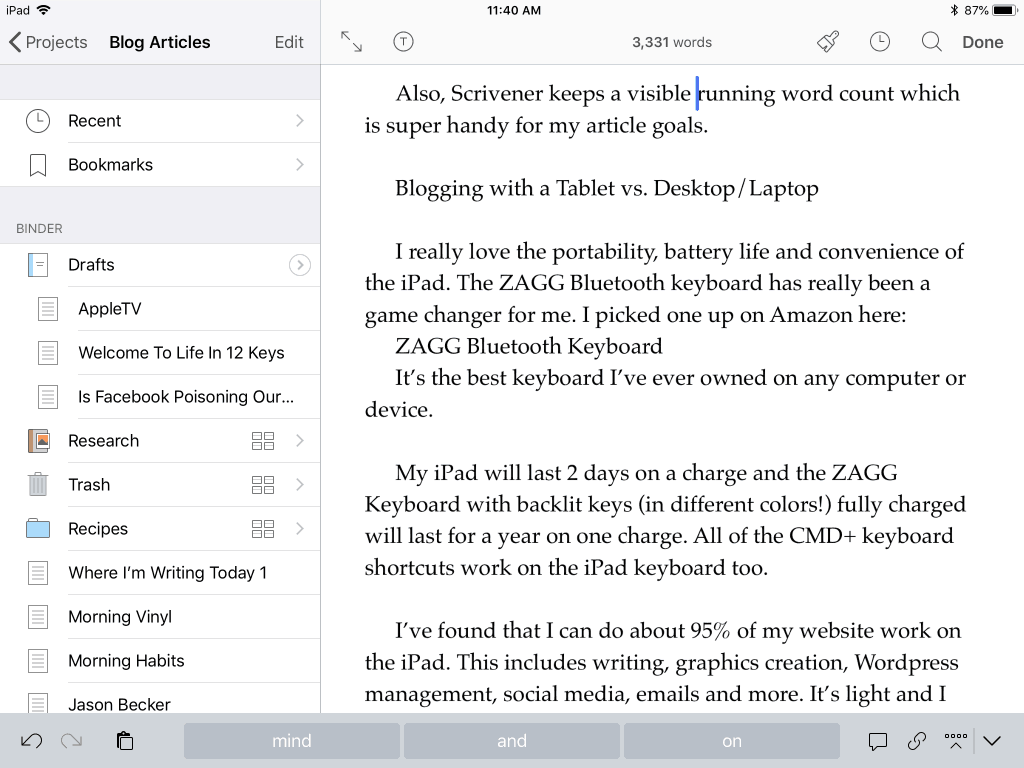
Scrivener saves all of my writing in one simple place organized however I like. It also syncs with Dropbox or the Desktop version available for Mac or Windows. (I’m using it on my iPad with my ZAGG Keyboard).
Also, Scrivener keeps a visible running word count which is super handy for my article goals.
Scrivener on the iPad Screenshot:
Blogging with a Tablet vs. Desktop/Laptop
I really love the portability, battery life and convenience of the iPad. The ZAGG iPad Bluetooth keyboard has really been a game changer for me. I picked one up on Amazon here:
ZAGG Bluetooth Keyboard on Amazon.com
It’s the best keyboard I’ve ever owned on any computer or device. I bought it just for blogging.
My iPad will last 2 days on a charge and the ZAGG Keyboard with backlit keys (in different colors!) fully charged, will last for a year on one charge. All of the CMD+ keyboard shortcuts work on the iPad keyboard too.
I’ve found that I can do about 95% of my website work on the iPad. This includes writing, graphics creation, WordPress management, social media, emails and more. It’s light and I can just throw it in my backpack (aka man-purse) and go.
The things I switch over to the MacBook to do are:
- Final WordPress formatting. It’s just faster and easier to select multiple lines of text, copy/past/cut/highlight, with a mouse or laptop touchpad.
- Tailwind Scheduling and Pinterest. Pinterest scheduling with Tailwind just works better on desktop versions of browser extensions for Safari or Chrome.
Tailwind
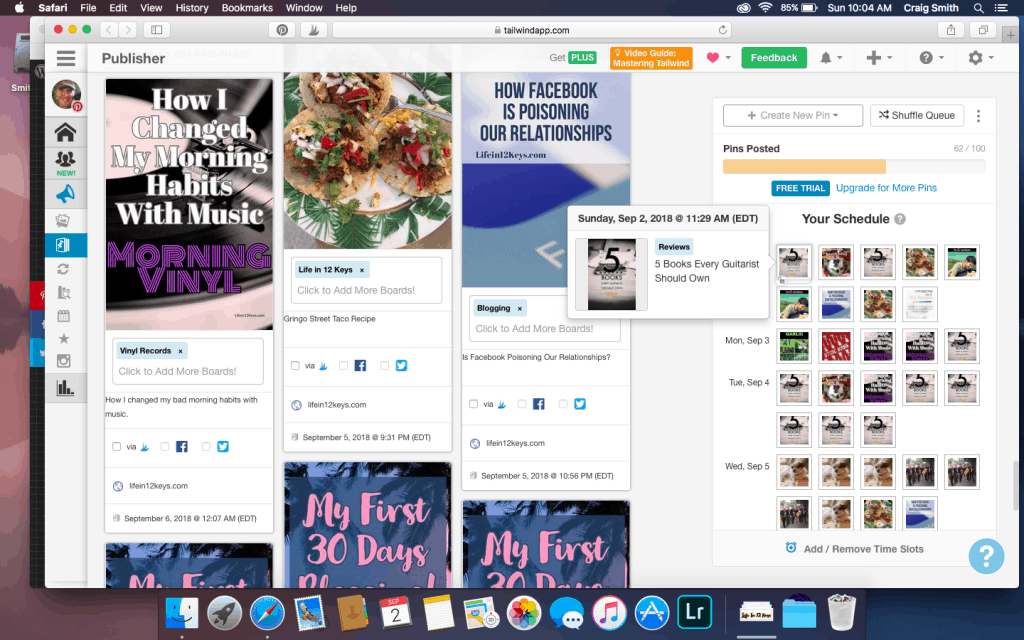
In short, Tailwind is a scheduling software that enables you schedule mass pins to Pinterest from your blog (or any other website on the internet).
As of this writing I’m only a few days into using it. The verdict is still out on this one. I’m doing the free trial month and so far I like it.
I’ll be sure to write more about it in next month’s blog report. If you use this link you’ll get a free month and so will I. 🙂
https://www.tailwindapp.com/i/lifein12keyscom
Successful Bloggers swear by Tailwind so I’m going to give it a few months and see how it goes. I’m glad I can try before I buy.
Tailwind Screenshot on the Mac. Scheduling Pinterest Pins:
Progress in August
I went “Live” on August 21st. By live I mean I actually told someone about my website besides my wife. I started promoting on some social media and Pinterest.
On August 27th I made my 9th blog post. My goal for my first month was eight. I’m happy with that. Most professional bloggers I’ve read about seem to agree with the 1-2 posts per week method, so I’m happy to be on par and even a bit ahead of this standard.
This article is #10 (on August 31st), and my longest yet, so I think I’m getting the hang of it.
Life Balance
I’m still playing guitar and gigging full-time 4-6 days per week. I’m trying do a full article on a day off and have it edited, formatted with graphics the following morning.
My workflow is still a work(flow) in progress. Once I get a handle on all of this stuff I’ll be sure do do a write up on what it is that is working best for me.
Right now I’m doing some social media in the morning, re-pinning my articles on Pinterest and just general tweaking of the website as I feel necessary.
Other Things I did in August:
I setup Google Analytics to see my traffic now that I’m officially “live”. Since my live date was August 21st, that’s where my reports start.
Google Analytics Screenshot on iPad:
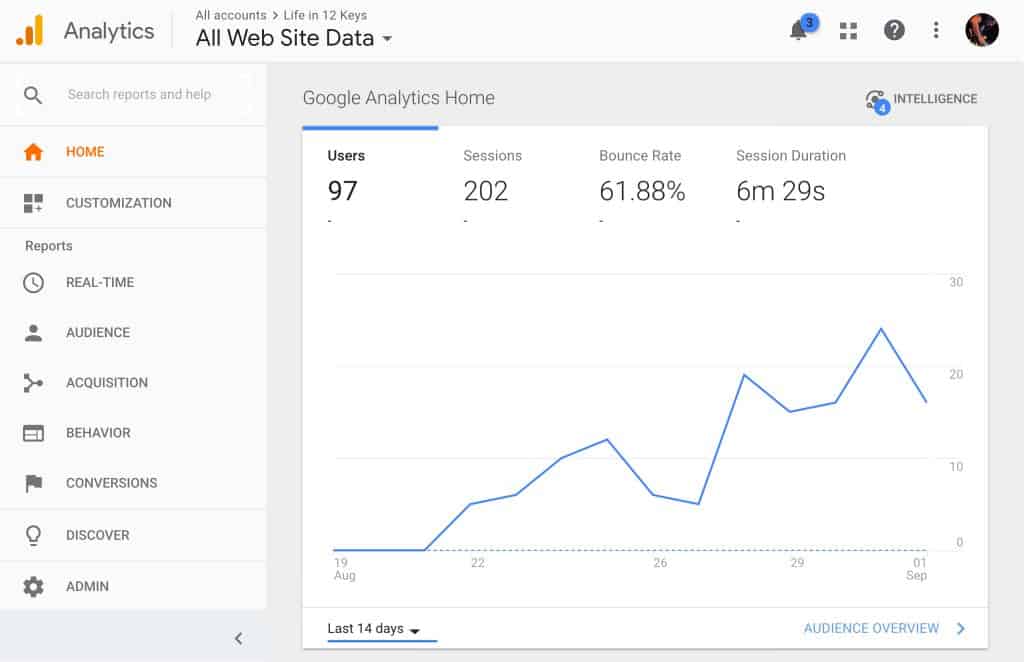
I’m still learning analytics, but am happy to report a steady increase in traffic since my first post. More on that next month.
I signed up for Amazon’s Affiliate Marketing Program.
So far I love it.
It’s very easy to use and I can find ads and links to anything I want. Very user friendly, and I’m able to promote things I genuinely use and love.
Since my wife and I use Amazon at least once a week, this one seemed kind of obvious. I don’t mind being an affiliate for a company I’ve used and trusted for over 15 years.
I setup a Gravatar.com account. This enables me to have a bio, picture and link to my blog whenever I comment on someone else’s blog around the internet. A must have for any new blogger.
I also setup social media accounts for “Lifein12Keys” on Facebook, Twitter, Pinterest and Instagram. I haven’t done much with these yet, but am focusing on Pinterest for traffic right now.
I’m surprised that as of 8/31 I’m getting the most incoming traffic from Instagram and Facebook. Not at all what I expected.
Advice: Try to get social media usernames close to your domain name that are consistent across all of your social media accounts.
Monetizing My Blog
Since there is a bit of cost involved with a blog, why not make some money off of it if you can. After all, writing is a time consuming hobby right?
I’ve done some research on affiliate marketing and running ads for commissions and extra income. There are so many so-called experts out there it is a bit overwhelming.
If you’ve already got your blog up and running and want to get right into monetizing it, check out: Monetizing Your Blog in 6 Easy Steps.
I kept going back to this girl Michelle Schroeder-Gardner creator of www.makingsenseofcents.com.
Several people around the web who were making a lot of money from their blogs were using Michelle’s course on Affiliate Marketing.
I did ALOT of research. I checked her out. I emailed people who said they used her course. I even emailed her directly. She replied the same day.
I read all of her financial reports. She’s making over $50k per month on her blogs using affiliate marketing. $50,000.00!!
She is 100% LEGIT.
….and honestly, I just like her dogs.
Yeah, she travels around in an RV (and now boat) with her husband and 2 dogs. You had me at dogs Michelle. 🙂

Check out her blog where she documents traveling with her pups and hubby around the country blogging along with many other helpful and interesting topics.
Making Sense of Affiliate Marketing
After tons of research and talking to some of her students, I decided to go ahead and grab her online course Making Sense of Affiliate Marketing.
I couldn’t be happier! I’m just now absorbing the information and slowly implementing what I’ve learned. I’ll definitely do a full review/write-up on this at a later date. Highly Recommended!
Well, I think thats about it for August! I’m looking forward to what September and beyond reveal for my blogging journey.
I truly hope this has helped someone just starting out blogging. Please feel free to comment below and let me know your thoughts or suggestions for new bloggers.
My Recommendations for New Bloggers:
- Creating Legal Pages First!
- AWS Amazon Web Services
- Namecheap.com
- Bluehost
- Adobe Spark
- ConvertKit
- Scrivener
- Google Analytics
- Tailwind
- Amazon Affiliates Program
- Making Sense of Affiliate Marketing Course
Until next month…….
[Update: If you liked this article, my September Mid-month journal is up now!]
Craig
Craig Smith is a professional Guitarist, Teacher, and Writer living in Sanford, Florida. Craig has taught guitar lessons, performed 200+ gigs per year for nearly 30 years, and published 4 guitar instructional books. When he’s not gigging or writing, you may find him by the pool with his wife Celeste, 4 Chihuahuas, and a drink. 🎸